


eSIM Japan
How Do I Buy An eSIM For Japan
Oct
Buying an eSIM for Japan isn’t complicated, but it becomes complicated when you skip critical steps, choose the wrong provider, or don’t know what to do when something inevitably doesn’t work as planned.
This guide exists because every other article assumes everything will go perfectly. This one assumes you need actual help.
Stop Overpaying in Roaming Fees (Or Wasting Time Hunting for Local SIM Cards)
Overseas travel often means choosing between outrageous roaming charges or scrambling for local SIM cards the moment you land.
One drains your budget. The other steals time away from your holiday.
Smart travelers are now switching over to eSIMs.
eSIMs give you data at a fraction of the cost of what your telco charges for roaming and most modern phones have eSIM technology set up – (although you’ll need to check your phone’s compatibility here).
How eSIM4.com Works:
- Step 1: Pick your destination and data plan
- Step 2: Scan our QR code (takes 3 minutes)
- Step 3: Land overseas with instant local network access
No queues. No tiny plastic cards. No bill shock.
Just seamless, affordable data from the moment you land.
Stop letting phone companies raid your travel budget. Join the smart travelers who’ve already switched.
Get Your eSIM NowFast-Track: Landing in Japan in Less Than 8 Hours?
You don’t have time for the full guide. Here’s what you do right now:
Step 1: Verify Your Phone Works With eSIM
- iPhone XR or newer? You’re good.
- Samsung Galaxy S20 or newer? You’re good.
- Google Pixel 3 or newer? You’re good.
- Something else? Check Settings → Connections → SIM Card Manager (Android) or Settings → Cellular/Mobile Data (iPhone). If you see “Add eSIM” or “Add Cellular Plan,” you’re compatible.
Step 2: Buy From eSIM4
- Go to eSIM4.com
- Select Japan
- Choose your data plan (3GB for a week is enough for most travelers; 5GB if you’re streaming)
- Complete purchase—you’ll receive your eSIM QR code via email within minutes
Step 3: Install Before Your Flight
- Connect to WiFi
- Open the email from eSIM4
- Click the installation link OR scan the QR code
- Follow the on-screen prompts
- Do NOT activate yet—just install
Critical Timeline:
- Installation: Do this NOW, while you’re still on home WiFi
- Activation: Happens automatically when you land in Japan
- Expected working data: Within 2-5 minutes of landing
If you’re truly pressed for time, this is enough. But if something goes wrong, come back and read the troubleshooting section. Better yet, bookmark this page now while you still have internet.
The Pre-Purchase Checklist: Don’t Buy Until You’ve Verified These
You’re about to spend money on something that only works if your phone meets specific requirements.
Is Your Phone Actually eSIM-Compatible?
“eSIM-compatible” sounds straightforward until you realize that even within the same phone model, certain versions don’t support it. Here’s how to verify for real:
For iPhone Users:
- Go to Settings → Cellular (or Mobile Data if you’re outside the US)
- Look for “Add Cellular Plan” or “Add eSIM”
- If you see it, you’re compatible
Compatible iPhones: iPhone XR, XS, XS Max, 11 series, 12 series, 13 series, 14 series, 15 series, SE (2nd and 3rd generation)
Important: iPhone 14 models sold in the US don’t have a physical SIM card slot at all—they’re eSIM-only. If that’s your phone, you MUST set this up before leaving.
For Samsung Users:
- Go to Settings → Connections → SIM Card Manager
- Look for “Add Mobile Plan” or “Add eSIM”
- If you see it, you’re compatible
Compatible Samsung phones: Galaxy S20 series and newer, S21 series, S22 series, S23 series, S24 series, Z Fold/Flip 2 and newer, Note 20 series
For Google Pixel Users:
- Go to Settings → Network & Internet → SIM cards (or Mobile Network)
- Look for “Add” or “Download a SIM instead?”
- If you see it, you’re compatible
Compatible Pixels: Pixel 3 and newer (including Pixel 3a, 4, 4a, 5, 6, 7, 8 series, Fold)
What If You Don’t See These Options?
Feel free to check our eSIM-supported devices here.
Is Your Phone Unlocked?
This is where most people get stuck. You can have an eSIM-compatible phone, but if it’s locked to your carrier, the eSIM won’t work in Japan.
How to Check If Your Phone Is Unlocked:
iPhone:
- Settings → General → About
- Scroll down to “Carrier Lock” or “Network Provider Lock”
- If it says “No SIM restrictions” or “Unlocked,” you’re good
- If it says anything else, your phone is locked
Android:
- Settings → Connections → Mobile Networks
- Look for “Network Operators” or “Mobile Networks”
- Tap “Search Networks” or “Network Operators”
- If you see multiple carriers listed, your phone is likely unlocked
- If you only see your current carrier, it might be locked
What If Your Phone Is Locked?
You need to contact your carrier and request an unlock. For example:
- T-Mobile: Usually unlocks after 40 days of service if you’ve paid off your device
- Verizon: Automatically unlocks 60 days after purchase for postpaid customers
- AT&T: Unlocks after contract/installment completion (typically 60 days for prepaid)
The Problem: This process takes 24-48 hours minimum. If you’re leaving tomorrow and just discovered your phone is locked, you won’t get an eSIM working in time. You’ll need to rent pocket WiFi at the airport or buy a physical SIM in Japan.
How Much Data Do You Actually Need?
Everyone overestimates or underestimates. Here’s what actual usage looks like:
For a 7-Day Trip:
Light User (1-2GB total):
- You check Google Maps occasionally
- You post a few photos to Instagram
- You use messaging apps
- You don’t stream video
Average User (3-5GB total):
- Frequent Google Maps navigation
- Regular social media scrolling
- Uploading photos and stories
- Occasional video calls back home
- Light YouTube or music streaming
Heavy User (7-10GB total):
- Constant Google Maps with real-time transit
- Heavy Instagram/TikTok usage
- Video calls daily
- Streaming music constantly
- Uploading 4K video content
- Working remotely with large file transfers
Reality Check: Most travelers fall into the 3-5GB range for a week. If you’re unsure, buy 5GB. Running out of data in a foreign country is more frustrating than spending an extra $10 upfront.
The “Install Before You Board” Rule
Read this carefully: You must install your eSIM while you still have reliable internet access.
Why? Because the installation process requires downloading the eSIM profile, which can be 5-10MB. Airport WiFi is notoriously unstable. If your download fails halfway through, you might not be able to retry, and you’ve wasted your purchase.
The Safe Timeline:
- 48+ hours before departure: Ideal—you have time to troubleshoot
- 24 hours before departure: Good—still manageable
- At the airport: Risky—WiFi quality is unpredictable
- On the plane: Impossible—can’t download without internet
- After landing in Japan: Too late—defeats the entire purpose
Install your eSIM the night before you leave, while sitting at home on your WiFi. Your future self will thank you.
Why eSIM4 Works Better for Japan (And What You Need to Know)
You’ve probably noticed we’re recommending eSIM4 specifically. Here’s why, and what you’re actually getting:
What Makes eSIM4 Different
Auto-Connection on Arrival: The moment your plane touches down at Narita or Haneda, eSIM4’s system detects you’ve arrived in Japan and automatically begins connecting to local networks. You don’t need to manually select a network or change settings. Within 2-5 minutes of landing, your data should be working.
The Network Reality: eSIM4 connects to major Japanese carriers. This matters because Japan’s network infrastructure is excellent in cities but can be spotty in rural areas or inside certain buildings (traditional Japanese architecture with thick walls can block signal). Your experience depends on where you’re traveling.
24/7 Support That Actually Responds: Most eSIM providers offer “support” through a chatbot that tells you to restart your phone. eSIM4 provides actual human support. If you’re standing in Shibuya Crossing and your data isn’t working, you can reach someone who can help troubleshoot.
Coverage Across Japan: eSIM4 works in all major cities (Tokyo, Osaka, Kyoto, Yokohama, Fukuoka) and most tourist destinations. If you’re planning to visit remote mountain villages or extremely rural areas, expect potential coverage gaps—but that’s true of any provider.
What You’re Actually Buying
When You Purchase an eSIM from eSIM4:
- You receive an email within minutes containing your eSIM details
- The email includes either a QR code to scan OR a direct installation link
- Your eSIM comes pre-configured for Japan’s networks
- Data allocation starts when you first connect in Japan, not when you install
- The eSIM remains active for the duration you purchased (7 days, 15 days, 30 days)
Pricing Structure (Always verify current prices on eSIM4.com):
- Plans typically range from 1GB to 50GB depending on trip length
- Prices are fixed—no hidden fees, no daily charges, no surprise bills
- You pay once, you get what you bought
- If you run out of data early, you can top up through their website or mobile app
The Mobile App Option: eSIM4 offers an optional mobile app that goes beyond just data management. Through the app, you can:
- Monitor your remaining data in real-time
- Top up data if you’re running low
- Purchase a virtual phone number if you need to receive calls or texts
- Buy international calling credits
- Send text messages
You don’t need the app for basic eSIM functionality, but it’s useful if you need these extra features during your trip.
What eSIM4 Doesn’t Do (Important Limitations)
No Phone Calls (Unless You Add Them): Your eSIM4 data plan provides internet only. You can’t make traditional phone calls or receive SMS to your regular phone number using just the eSIM. You can use WhatsApp, FaceTime, Line, or other internet-based calling apps.
If you need to make actual phone calls, you can purchase international calling credits through eSIM4’s app.
No Unlimited Data: Unlike some home plans, your eSIM has a specific data allocation. When you use it up, it’s gone (though you can top up). This means you need to be somewhat conscious of data usage—no 4K Netflix streaming unless you’ve bought a larger plan.
Device Limitation: Your eSIM works on one device only. If you’re traveling with family and everyone needs data, each person needs their own eSIM (or you need to look at tethering options if your plan allows it).
Step-by-Step: Buying Your eSIM from eSIM4
Let’s walk through the actual purchase process so there are no surprises.
The Purchase Process
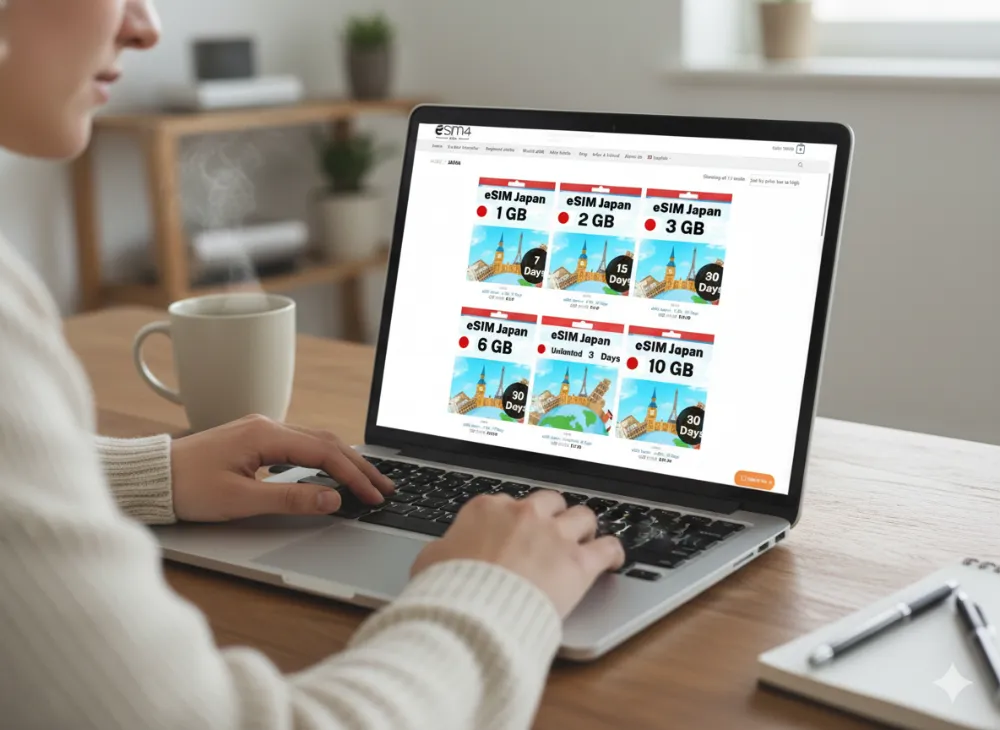
Step 1: Visit eSIM4.com Go directly to https://www.esim4.com/
Step 2: Select Japan
- Look for the country selector or search bar
- Type “Japan” or scroll to find it
- Click on Japan to see available plans
Step 3: Choose Your Data Plan
You’ll see options like:
- 1GB / 3 days – bare minimum, good for short business trips if you only use maps and messaging
- 3GB / 7 days – the sweet spot for most travelers spending a week in Japan
- 5GB / 15 days – ideal if you’re there two weeks or if you stream more often
- 10GB / 30 days – for long stays, digital nomads, or anyone working remotely
If you’re hesitating between two plans, always round up. Running out of data mid-trip means scrambling for WiFi, which is never fun in a Tokyo subway station.
Step 4: Checkout
Enter your email address carefully—this is where your QR code and install link will be sent. Payment is straightforward (credit card or PayPal). Within minutes, you’ll receive your eSIM instructions.
Step 5: Install While Still Home
Follow the steps in the email. Make sure you’re on stable WiFi, and remember: install does not mean activate. You’ll only go live once you land in Japan.